Saturday, December 31, 2011

Holiday work

I'm currently on a holiday break from my day job, and even though I should be relaxing it's hard for me to sit still. This was a good time for me to not work on commissions and instead do some of the things I haven't had a chance to work on. As a result, there are a few projects to share. First up is a belt buckle that came about during all the welding a couple weeks ago:
Next is a lacing fid, which is used for knotwork/edge lacing/plaiting. They're great for loosening and/or tightening knots, braids, etc. This one has been ground down from half of a 15mm ratcheting wrench that I found on the street:
 It's a little stubby, but very satisfying to hold. As to be expected, there can't be creation without some destruction, and my knuckle was on the receiving end of a little of that this morning.
It was while I was finishing up some edge filing on the spines of my Spyderco pocket knives:


And last but not least - totes! I've had an industrial sewing machine (Juki DDL-555-4) for a while now, and even though I sew all my leather projects by hand there have been some other things I've wanted to make that could be done on a sewing machine. This machine is a beast, and kind of intimidating, and as a result I haven't made much time to sit down and get some practice. Till now. The Juki, myself and some canvas sat down for a few days to get better acquainted and, once we were all on speaking terms, I made myself some sturdy canvas tote bags. The olive green ones are a little more burly, as the webbing goes all the way around the bottom, and I intend to cart my groceries in them. The tan/drab ones aren't quite as tough, but should be just fine for grabbing a few things at the store:


Monday, December 26, 2011

The last few weeks have been pretty busy, despite not having a ton of Xmas orders. I've been doing a little welding, and though I definitely need some more practice I've managed to make a couple of serviceable creations. Up first is a front bike rack for the Hipster Incinerator:


It didn't need to be pretty, but I did want something to hold the heaviest item that comes with me when biking - the U-lock. The welds are disgusting but they'll support my weight, and as long as it can hold the lock then I'm happy.
Up next is a bottle tree that I made for my mother's Xmas gift. Because, let's face it, when your mom wants a bottle tree, you make her a bottle tree. Most of the examples I saw online were pretty boring, and usually consisted of a straight post then a few straight "branches" coming out at angles (side note - why do most bottle trees only use blue bottles?) I thought it would be more fun and interesting to make something a little more tree-like and spooky:
Arts and Drafts recently celebrated the holidays with our annual white elephant gift exchange, which is always a great time and usually involves a lot of scheming, plotting and thieving. For one of my contributions I made a plain leather Moleskine cover, which is not dyed or sealed in any way. This prevents any oils or dyes from bleeding into the notebook and also allows for the leather to get darker with use. There are some fantastic examples of these kinds of leather covers out there, and many allow the elastic band to be utilized, but I thought that design element could be improved. Without naming names or pointing a finger, the examples I saw had the elastic wrapping around the notebook cover, continuing into the leather cover for an inch or so, exiting a small hole, turning around then wrapping around the outside of the wrapped notebook. This creates excess bulk and also means that there's only a small amount of leather between a stitch line and the exit hole, which is a weak spot and a point of possible failure. For my version I have the elastic exit right at the edge of the leather cover, which avoids having to create a weak spot, is much simpler and negates the excess bulk of having the elastic doubled up inside:


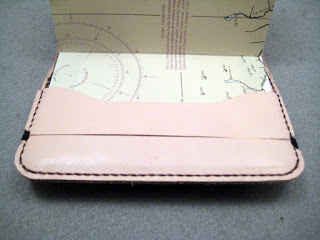
This is just a prototype and I'll probably refine this a bit more on a later version, but for now it's functional.
And finally, this is a project that's been waiting to happen for a while, but I was only able to get to it in the time between Thanksgiving and Xmas. The cabinet maker who made the top for my work bench has a really large pistol that needed a holster, so I made him one. It's set up for either belt or shoulder strap carry, and here it is:


Sunday, December 11, 2011

Battle Clutch!


Just finished this scaly Battle Clutch. There are 12 card slots, two large pockets for cash or receipts, plenty of room in the middle for a cellphone, cigarettes, etc., and sturdy brass zipper will ensure years of use. The interior pockets are veg-tanned leather that's been dyed a subtle mix of green and purple, and the exterior is a mix of deer-tanned cowhide and doe kidskin. Available.

Monday, December 05, 2011

Sneak peek


A couple of sneak peeks of projects-in-progress. Check back soon for more photos once they are complete.

Sunday, November 27, 2011

Recent wallets and current goings-on

There was a wallet I made as a Xmas commission last year, for a friend to give to another friend, and it was recently involved in an accident. It took a trip through the washing machine, and they wanted to see what I could do to fix it. Here's the washed leather after disassembly:

It clearly needed some help. What it took was to be deglazed multiple times, to get rid of any old dyes and sealants, a lot of dye and a lot of oil and conditioning. The end result:
 
It still had some variations in the dyeing, especially inside on the pockets, as I don't think all of the original sealant came up, but at least it's close to it's original coloring.

Onto the next wallet. This was a commission for a Bar Mitzvah, and the idea was to place imagery from a Menorah on the outside, and the inside was to be inscribed in Hebrew with his name and the date of the ceremony. Luckily I work with a Hebrew bibliographer at the library, and he was able to help me with the translation and font choice.


My camera doesn't handle black leather very well, but I'm told the recipient was very happy with his gift. Up next was a birthday commission for the same individual who commissioned the above wallet. His wife wanted to replace his aging biker trifold with something more personal, and suggested using Ray Harryhausen fighting skeletons for imagery. This was a fantastic idea, and I set about making a sketch for something that would be recognizable as such without directly ripping off anyone:


This design snaps securely shut and utilizes a chain, just like a biker wallet, but without the bulk of a trifold. And last but not least, a couple of photos of current projects. I'm in the middle of making a molded leather holster for a gigantic pistol, so here's a photo of the in-progress molding:
And here's a pic of some recent additions to the leather stash. I walked into the store intending to buy rivets, and walked out with rivets and eight hides. The lure of odd leather at a great price was simply too much to ignore:

Saturday, November 05, 2011

I was recently approached about doing some restoration work on a clutch and a wallet. They were made about 60 years ago and were gifts to the client and her mother. The clutch had been obviously cared for and was just a little worn, and the job was to replace two sections of broken edge braiding and replace a wrist loop. The wallet was in worse shape and was dried out and stiff, and all of the edge braiding had to be replaced. Plus, the interior pockets weren't very useful, so I changed the inside to include more card pockets and two sections for cash. Here is the wallet after removing the original edge braiding:


And here's the finished wallet. I redyed and oiled it, added a more practical interior and all new edge braiding:


I forgot to take pictures of the clutch before I started working on it, but it was in pretty good shape. There were some small areas of dried leather, but a good cleaning with saddle soap improved those. The original wrist loop was a simple strap, and she wanted something that looked nicer and could also be tucked into the clutch when not in use. I opted for a plaited strap positioned where the zipper closed, so it could be zipped into the clutch. The edge braiding had some broken sections where it curved around the bottom, and here's a photo of where the old braiding ends and the new begins: